Offer Management
The Offer Management tab displays the following sub-tabs:
-
Comp Accounting
-
Authorizers
-
Departments
-
Offers
-
Comp Restrictions
-
Comp Reasons
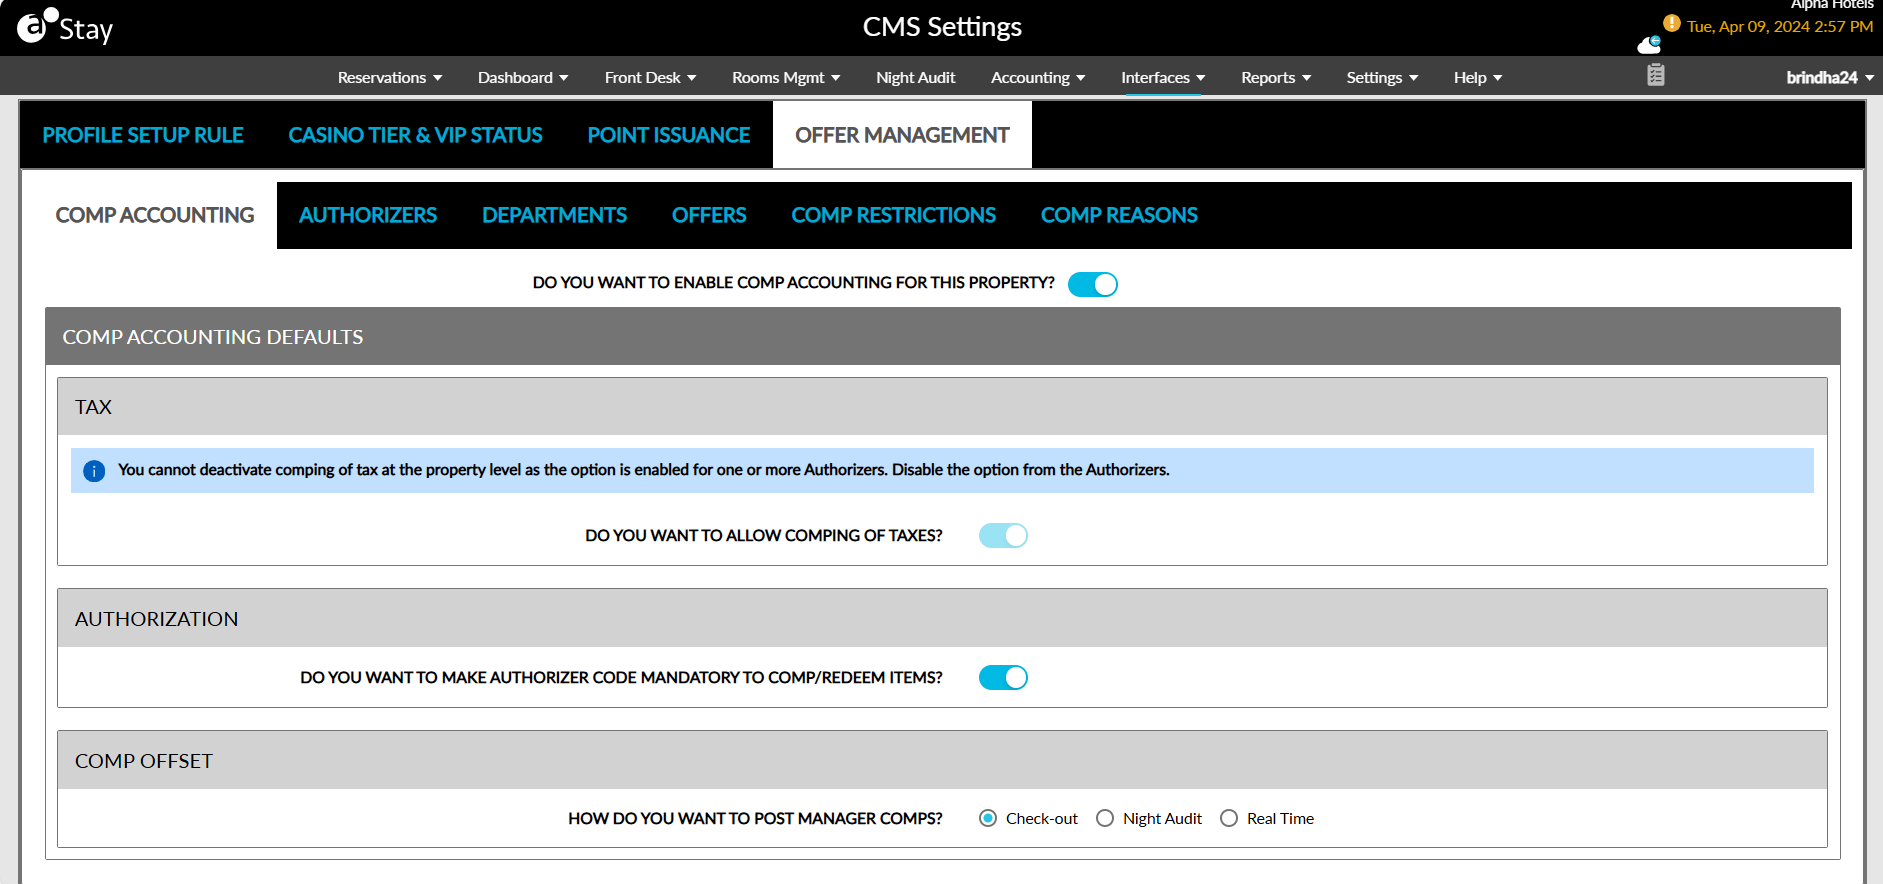
Comp Accounting
This tab allows users to configure the comp accounting default settings for the property.
Enable the Do you want to enable comp accounting for this property? flag to turn on comp accounting for the property.
Enable the flag in the Tax section if comps can be used for paying taxes.
Enable the flag in the Authorization section to make the authorizer code mandatory while redeeming comps.
Select if the comps must be posted during checkout, night audit, or real-time in the Comp Offset section.
Click Save to save the comp defaults for the property.
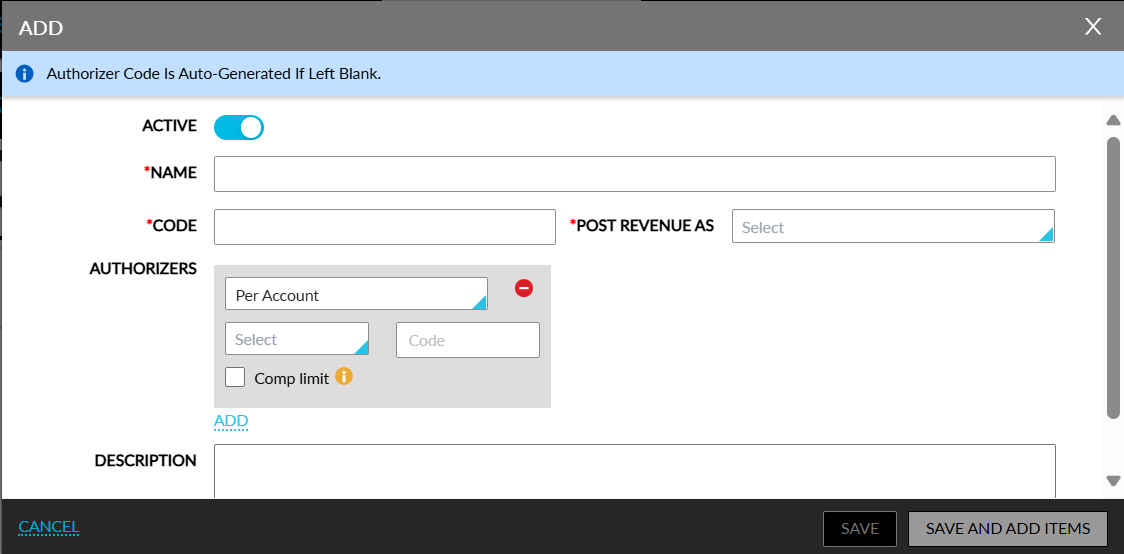
Authorizers
A Comp Authorizer is a user who authorizes the redemption of comps. Authorization limits can be set for the authorizers. Perform the following steps to set up and manage comp authorizers.
Click the Add button. The Add pop-up screen appears.
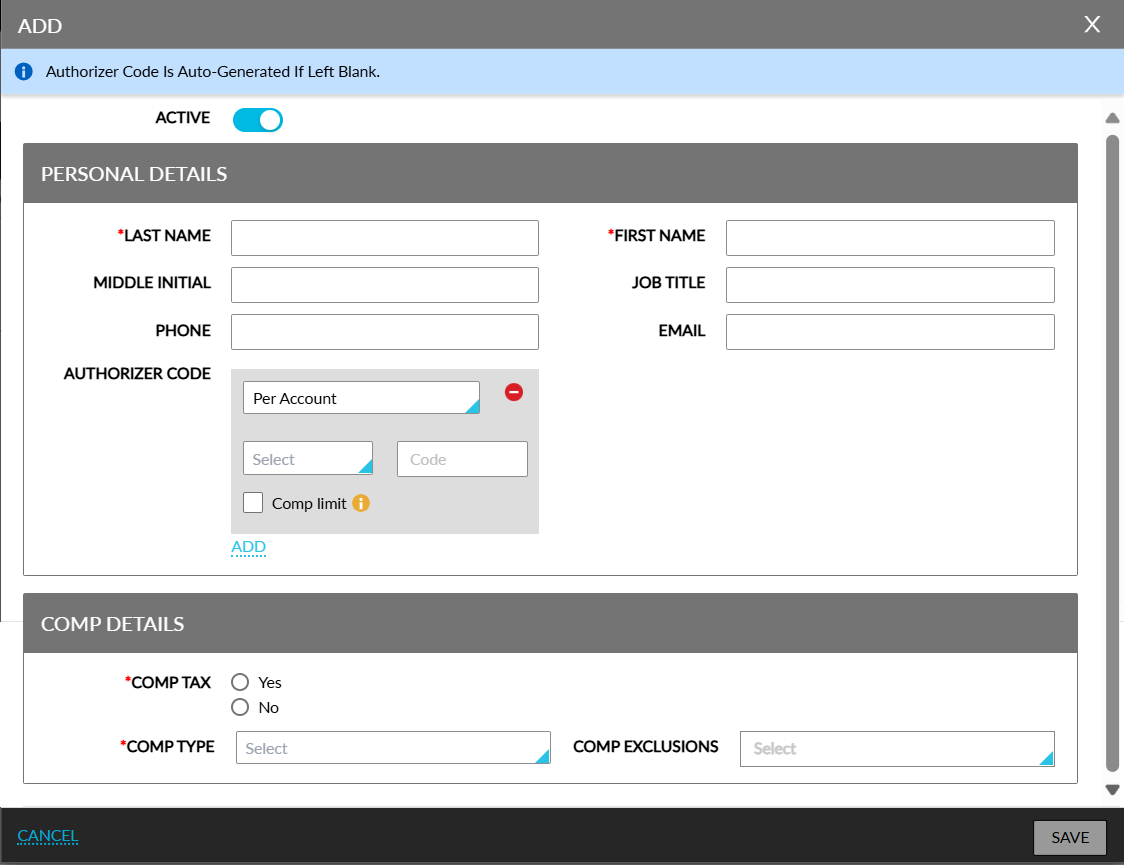
Refer to the following table and fill in the fields.
|
Field |
Description |
|---|---|
|
Personal Details |
|
|
Active |
Enable this flag to make the comp authorizer active |
|
Job Title |
Job title associated with the comp authorizer |
|
Last Name |
Last name of the authorizer |
|
First Name |
First name of the authorizer |
|
Middle Initial |
Middle initials of the comp authorizer |
|
Phone |
Phone number of the authorizer |
|
|
Email ID of the authorizer |
|
Authorizer Code |
Select the preferred account type to associate the authorizer with and enter the authorizer code. The code must be within 4-16 alphanumeric characters. Authorizer code is auto-generated if left blank. |
|
Comp limit |
Select to set a maximum amount for the authorizer per account type and enter the amount |
|
+Add |
Add a new department |
|
Comp Details |
|
|
Comp Tax |
Auto-filled depending on the selection made in Property Comp Defaults |
|
Comp Type |
Select comp type as Player Self Redeem or Admin Comp from the drop-down list |
|
Comp Exclusion |
Select items to be excluded from comp redemption |
Click Save to add the comp authorizer.
Departments
The Departments tab comprises of items that can be redeemed with comps and the comp authorizers.
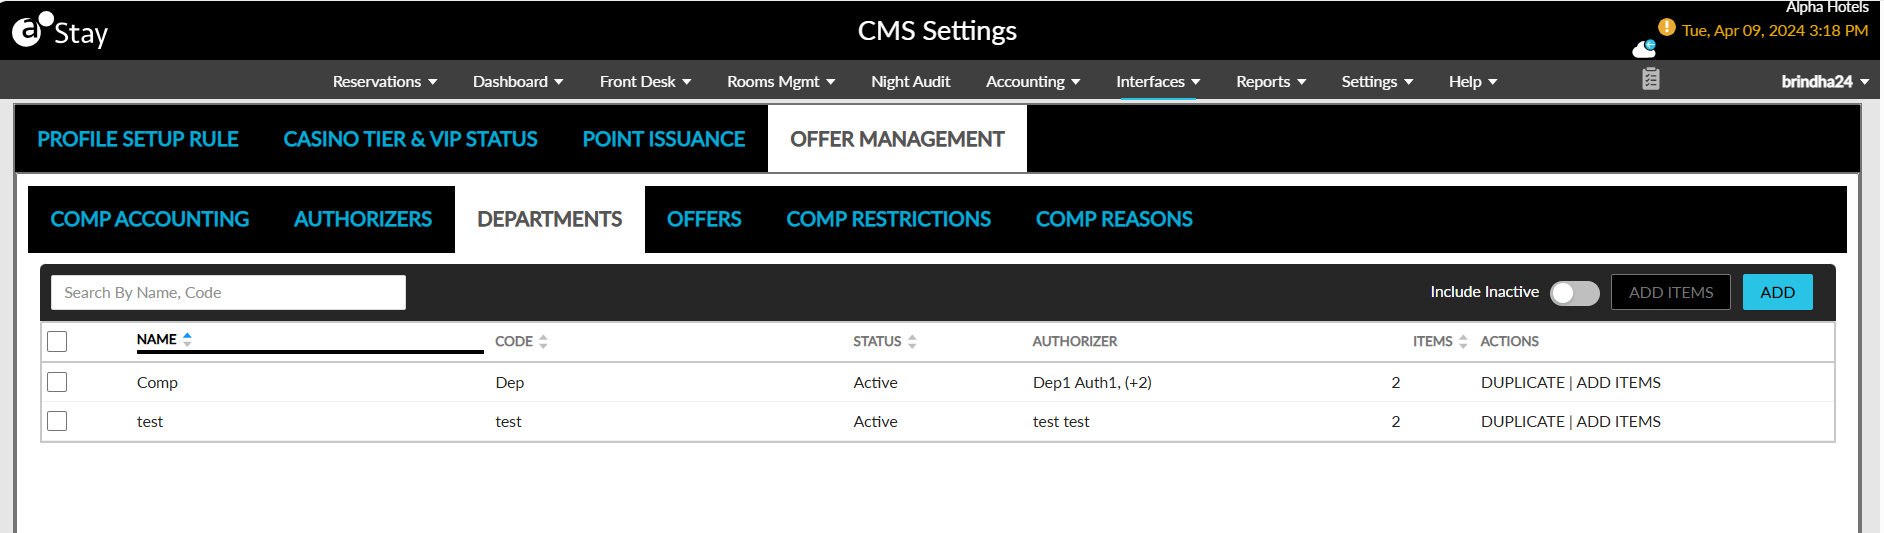
Perform the following steps to set up and manage comp departments.
Click the Add button. The Add pop-up screen appears.
Refer to the following table and fill in the fields.
|
Field |
Description |
|---|---|
|
Active |
Select to make the comp department active |
|
Name |
Name of the comp department |
|
Code |
Code for the comp department |
|
Post Revenue As |
Select an item from the drop-down list |
|
Authorizers |
Select the preferred account type and enter the authorizer code. |
|
Comp limit |
Select to set a maximum amount for the authorizer per account type and enter the amount |
|
+Add |
Add a new authorizer |
|
Description |
Description of the comp department |
Click Save to create the new department.
Click Save and Add Items to create the new department and open the Add Comp Items pop-up screen.

Select the items to be added from the list of transactional and inventory items.
Click Add to add the items to the department.
Offers
This tab allows users to create and edit comp and admin offers and associate them with Comp Routing Rule Templates.
Users must first create a Comp Routing Rule Template and associate it with the offer. Refer to the Routing Rule Templates section for more information on creating the templates.
An offer becomes inactive when the associated Comp Routing Rule Template is inactive.
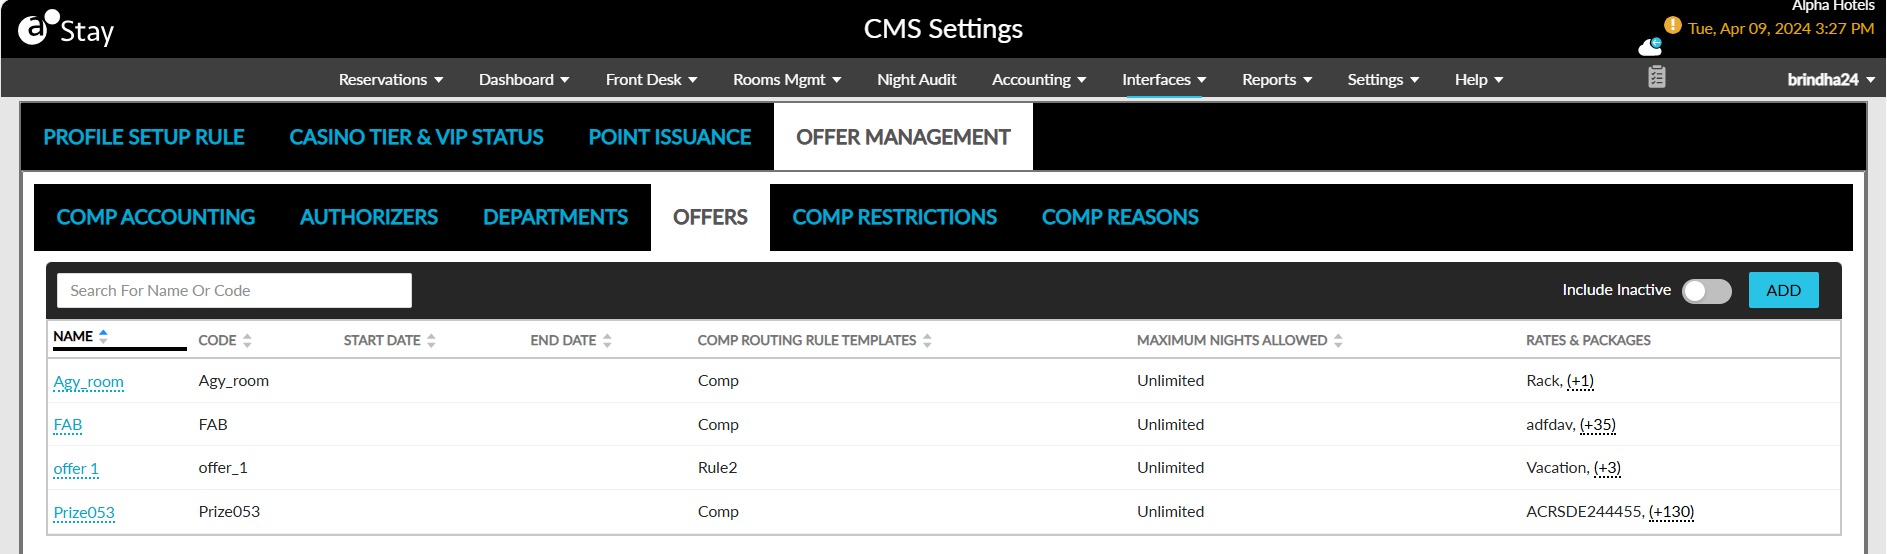
Perform the following steps to create new offers:
Click Add. The Add pop-up screen appears.
Refer to the following table and fill in the fields.
|
Field |
Description |
|---|---|
|
Offer Code |
Code for the offer |
|
Offer Name |
Name of the offer |
|
Start Date |
The start date of the offer. |
|
End Date |
The end date of the offer. |
|
Description |
Description of the offer |
|
Rates & Packages |
Select one or multiple Rate Plans and Packages from the drop-down list to associate with the offer |
|
Comp Routing Rule Templates |
Select a Comp Routing Rule Template from the drop-down list to associate with the offer |
|
Admin Comp Authorizer |
Select the name of the authorizer from the drop-down list |
|
Promotional Offer |
Displays the following fields:
|
|
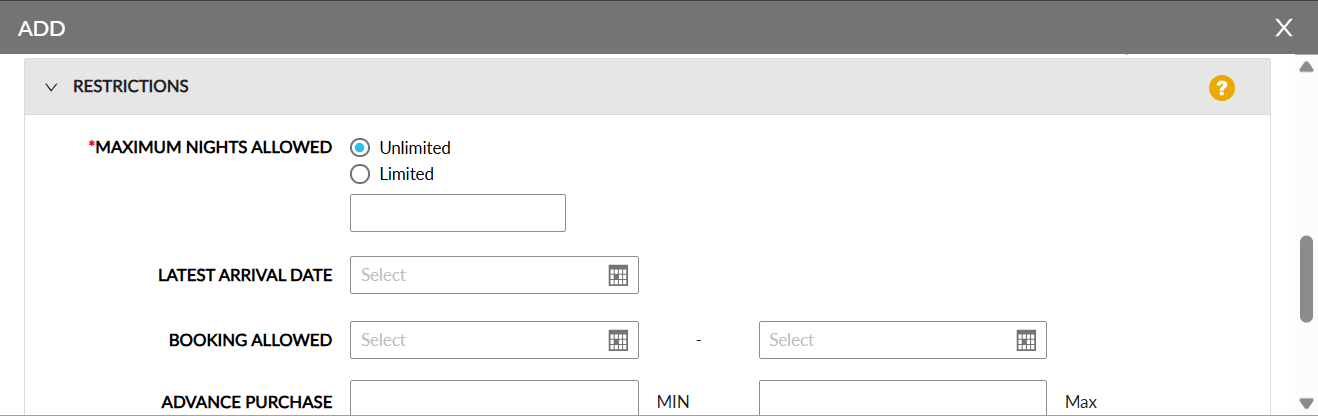
Restrictions |
|
|
Maximum Nights |
Select between unlimited or a specific number of nights using the radio buttons. Enter the number of nights if not choosing the unlimited option |
|
Advance Purchase |
This is an optional numeric input field that allows users to define the minimum and maximum number of days in advance a reservation must be booked by a guest to be eligible for the offer. Users can configure the values for the following fields:
Users cannot enter 0 or any negative values in these fields. |
|
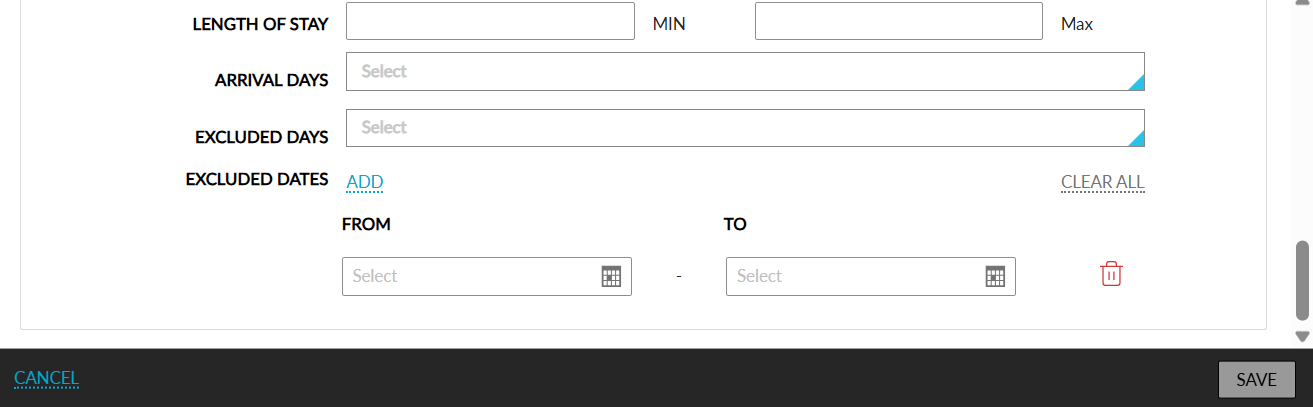
Excluded Days |
This is an optional multi-select drop-down list that allows users to select the days of the week when the offer will not be available for redemption. The offer will be displayed as N/A for the selected days in the Book a Reservation and Modify Stay screens. |
|
Excluded Dates |
This is an optional field that allows users to define the date range for which the offer will not be available for redemption. Users can define multiple date ranges by clicking on the Add hyperlink. Users can define the date range in the following fields that appear when the Add hyperlink is clicked:
The date range configured can be deleted using the delete icon. The Clear All option can be used to reset and clear all the date ranges configured. |
|
Booking Allowed |
This is an optional field that allows users to select the start and end dates during which an offer can be redeemed. Users can select the dates in the date pickers displayed. |
|
Latest Arrival Date |
This is an optional field that allows users to select the last date on which a reservation must arrive to redeem the offer. The arrival date of a reservation must be on or before the selected date to redeem the offer. |
|
Length of Stay |
This is an optional field that allows users to define the minimum and maximum length of a reservation to be eligible to redeem the offer. Users cannot enter 0 or any negative values in these fields. |
|
Arrival Days |
This is an optional multi-select drop-down list that allows users to select the days of the week on which the arrival day of a reservation must match to be eligible to redeem the offer. When the arrival day does not match, the offer will not be displayed in the Book a Reservation screen. |
When users click on the legend displayed in the Restrictions section, the following details are displayed:
NOTE
-
Maximum Nights Allowed - Define the maximum number of complimentary (comped) nights included with this offer.
-
Latest Arrival Date - Define the last date on which the arrival is allowed.
-
Booking Allowed - Define the start date and end date from which the offer can be sold.
-
Advance Purchase - Define the minimum and maximum number of days in advance a guest must book to be eligible for this offer.
-
Length of Stay - Define the minimum and maximum stay nights allowed.
-
Arrival Days - Define the arrival days of the week that the offer is valid.
-
Excluded Days - Define the days of the week on which the offer is not available.
-
Excluded Dates - Define specific dates and/or date ranges on which the offer is not available.
For comp offers, the Offer Code must match the code set in the CMS. If not, the offer will fail during redemption.
Click Save to create the offer.
Click an offer code to open the Edit Offer pop-up screen and edit the created offer.
Click Save to save the changes made to the offer.
Based on the start and end dates configured for an offer, a comp routing rule template can be selected from the Comp Routing Rule Templates drop-down list. By default, all comp routing rules configured at the property are displayed, but only the routing rule templates whose validity matches the validity of the offer or extends beyond the validity of the offer can be selected.
Routing rule templates whose validity expires prior to the offer’s validity cannot be selected. When selected, the following message is displayed: Routing rule cannot be applied due to offer date mismatch. In this case, users can create a new routing rule or modify the validity dates of the selected routing rule.
The following table lists the various scenarios in which a comp routing rule can be applied based on the validity dates of the offer and routing rule.
|
Offer Start Date |
Offer End Date |
Routing Rule Start Date |
Routing Rule End Date |
Routing Rule Usage |
|---|---|---|---|---|
|
01 January, 2024 |
01 March, 2024 |
01 January, 2024 |
01 April, 2024 |
Yes |
|
01 January, 2026 |
01 July, 2026 |
01 January, 2025 |
01 August, 2026 |
Yes |
|
01 January, 2026 |
01 July, 2026 |
01 January, 2025 |
01 February, 2026 |
No |
|
01 January, 2026 |
01 July, 2026 |
01 January, 2024 |
01 July, 2025 |
No |
The Start Date and End Date columns in the Offers tab of the CMS Settings screen displays the start and end dates configured for the offer.
Categorize Offers as Qualified or Unqualified
Stay allows users to categorize offers as either qualified or unqualified and send details of the selected offers to Bally CMP.
The Qualified flag in the Add and Edit pop-up screens that appear when users create a new offer or modify an existing offer (Interfaces ➜ CMS Settings ➜ Offer Management ➜ Offers) must be used for this feature. This flag is enabled by default.
-
Offers that have the Qualified flag enabled are considered as Qualified offers
-
Offers that have the Qualified flag disabled are considered are Unqualified offers.
After an offer is created, the Qualified flag can be modified in the Edit pop-up screen. When the flag is modified for an offer that is already applied to a reservation, there will be no impact on the reservation.
For offers that are marked as inactive, the Qualified flag will be enabled and must be disabled manually if required. The Type column in the Offers tab in the CMS Settings screen displays the type of offer, that is, qualified or unqualified.
-
All existing non-promotional offers are classified as qualified offers by default, that is, the Qualified flag will be enabled.
-
All existing promotional offers are classified as unqualified offers by default, that is, the Qualified flag will be disabled.
Display Offers in Book a Reservation Screen
The qualified offers are displayed in the Book a Reservation screen based on the arrival and departure dates of the reservation and the rate plans associated with the offers selected in the Offers filter.
The offers are displayed in the Offers filter based on the following conditions:
|
Condition |
Non-Promotional Offers |
Promotional Offers |
|---|---|---|
|
When offer code is entered |
Yes |
Yes |
|
When offer code is retrieved from the CMS for a patron ID |
Yes |
Yes |
|
Auto Apply Promotional Offers in Rate Plan |
NA |
Yes |
|
User clicks Show all offers |
Yes |
Yes |
The unqualified offers are displayed in the Book a Reservation screen based on the arrival and departure dates of the reservation and the rate plans associated with the offers selected in the Offers filter. When the Show all offers checkbox is selected, all the active eligible offers are displayed.
By default, all the unqualified offers are displayed in the Offers filter.
Applying Promotional Offers
Users will no longer be required to select the Show all offers checkbox in the Book a Reservation screen to view the promotional offers. They will be displayed by default in the Offers filter and will be applied automatically when the associated rate plan is selected regardless of the following:
-
Whether the Qualified flag is enabled or disabled.
-
Whether the Show all offers checkbox is selected or not.
-
The patron ID is entered or not.
Comp Restrictions
The Comp Restrictions tab allows users to configure comp restrictions to be applied to the reservations created for casino players.
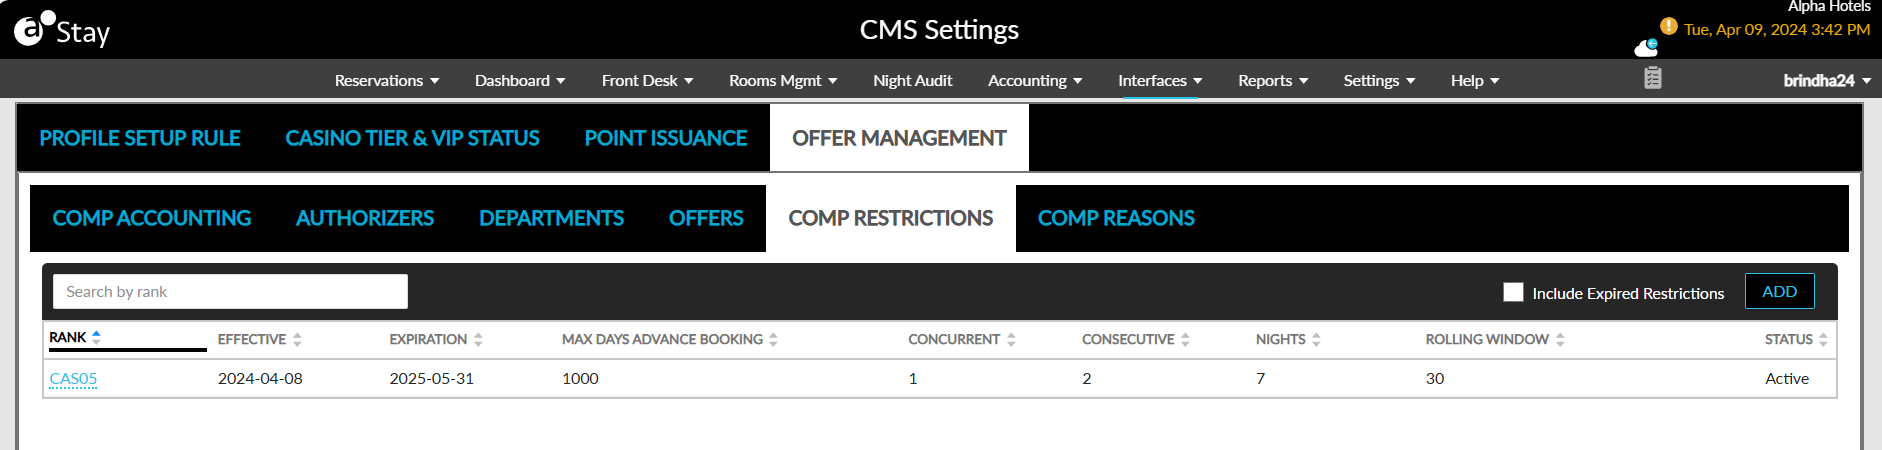
Perform the following steps to create comp restrictions:
Click Add. The Add pop-up screen appears.
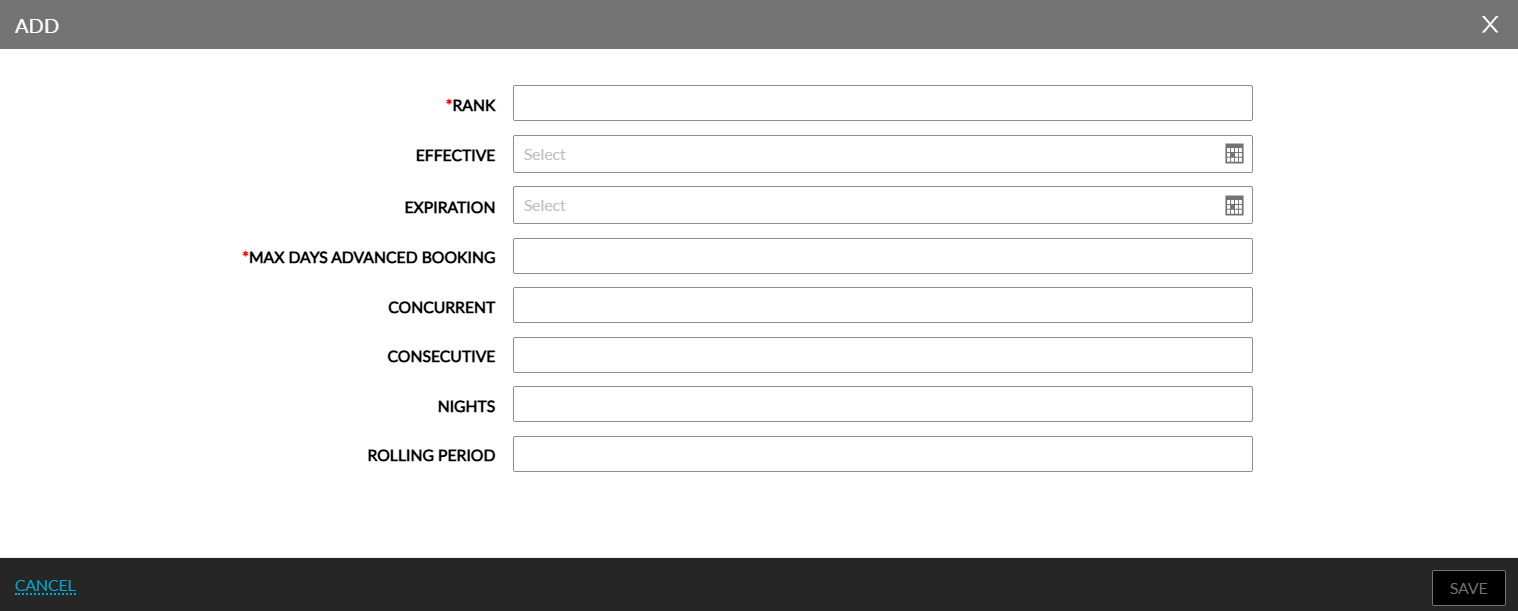
Enter the details given in the following table:
|
Field |
Description |
|---|---|
|
Rank |
The loyalty level of the casino players for which this rule will be applied. |
|
Effective Date |
The date from which the rule must be effective. |
|
Expiration Date |
The date till which the rule must be effective |
|
Max Days Advance Booking |
Comp nights will not be bookable if users are booking a reservation beyond this number of days. |
|
Concurrent |
The maximum number of rooms that can be comped on a single night for this rank. |
|
Consecutive |
The maximum number of discounted nights a guest can book consecutively. |
|
Nights |
The maximum number of nights that can be booked within the rolling window period. |
|
Rolling Window |
The window period within which comp nights are applied for a rank. |
Click Save. The restriction gets added successfully.
Apply Restrictions for Promotional Offers
Stay allows users to configure and apply restrictions for promotional offers.
When users select the Enable promotional offer nights checkbox, the Restrictions section will be displayed, allowing users to configure restrictions for promotional offers.
Restrictions can be configured for promotional offers in the Restrictions section.
When restrictions are configured for promotional offers, the restrictions are validated at the time of booking, and the promotional offer is applied only when the booking meets all the configured restriction rules. When any of the restrictions are not satisfied, the offer will not be applied.
When the Enable promotional offer nights checkbox is selected for an offer, the Maximum Nights Allowed field in the Restrictions section will be hidden automatically since this field is not applicable for promotional offers. Other fields will remain enabled for configuration.
When an offer is marked as NA for specific days, the offer will not be displayed for those days in the Check Rates tab of the Book a Reservation screen.
Modify Stay Screen
Whenever users modify a reservation and the Modify Stay screen appears, all offers applied to the reservations are validated again. The following restrictions are validated for the existing nights:
-
Latest Arrival Date
-
Arrival Days (day-of-week rules)
-
Minimum Length of Stay
-
Maximum Length of Stay
When any of the restrictions are not satisfied, the offer is removed from the reservation and not displayed in the Modify Stay screen.
The following table lists the various scenarios in which the restrictions are validate again:
|
Field |
Validation |
|---|---|
|
Latest Arrival Date |
When the arrival date is modified beyond the allowed date, the applied offer is removed. |
|
Arrival Days |
When the arrival date is modified to a date that is not allowed, the applied offer is removed. |
|
Minimum LOS |
When the stay duration is shortened below the minimum limit, the applied offer is removed. |
|
Maximum LOS |
When the stay duration is extended above the maximum limit, the applied offer is removed. |
For the newly added nights, all restrictions are always validated.
Clone Offers
Users can clone existing offers using the Clone button in the Offers tab. Users can select the preferred offer and click on the Clone button. When clicked, the Add pop-up screen appears with the offer details prepopulated. Users can modify the details if required and save the offers with a new name and code.
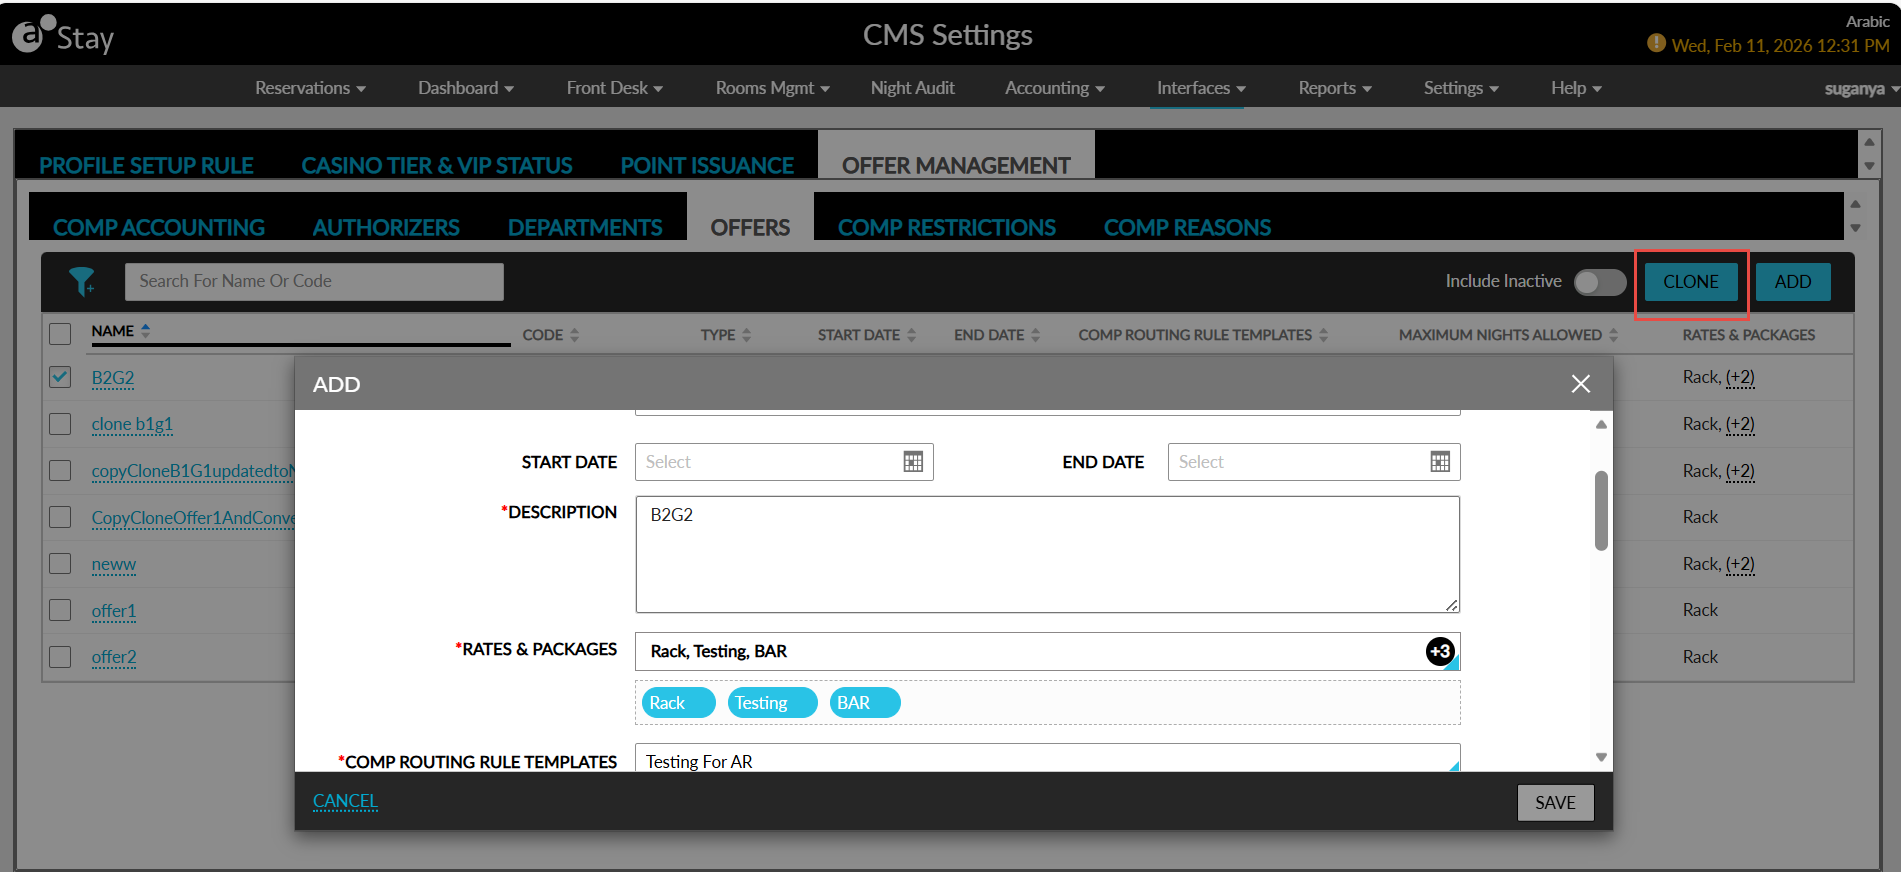
The following messages will be displayed when users save the offer with an existing name or code:
-
Error: Existing offer has the same offer name
-
Error: Existing offer has the same offer code
The Clone button will be disabled when more than one offer is selected.
Convert Offers
When users convert a non-promotional offer into a promotional offer, all the previously configured restrictions will be retained.
Similarly, when converting a promotional offer into a non-promotional offer, the existing restrictions will continue to apply without any changes.
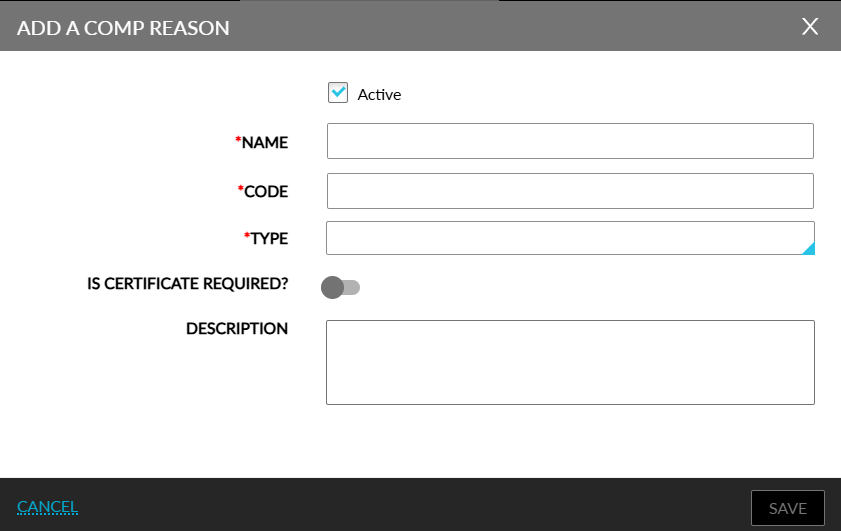
Comp Reasons
The Comp Reasons tab allows users to configure the reasons to be applied when booking comp rooms and the comp threshold limit for the property.
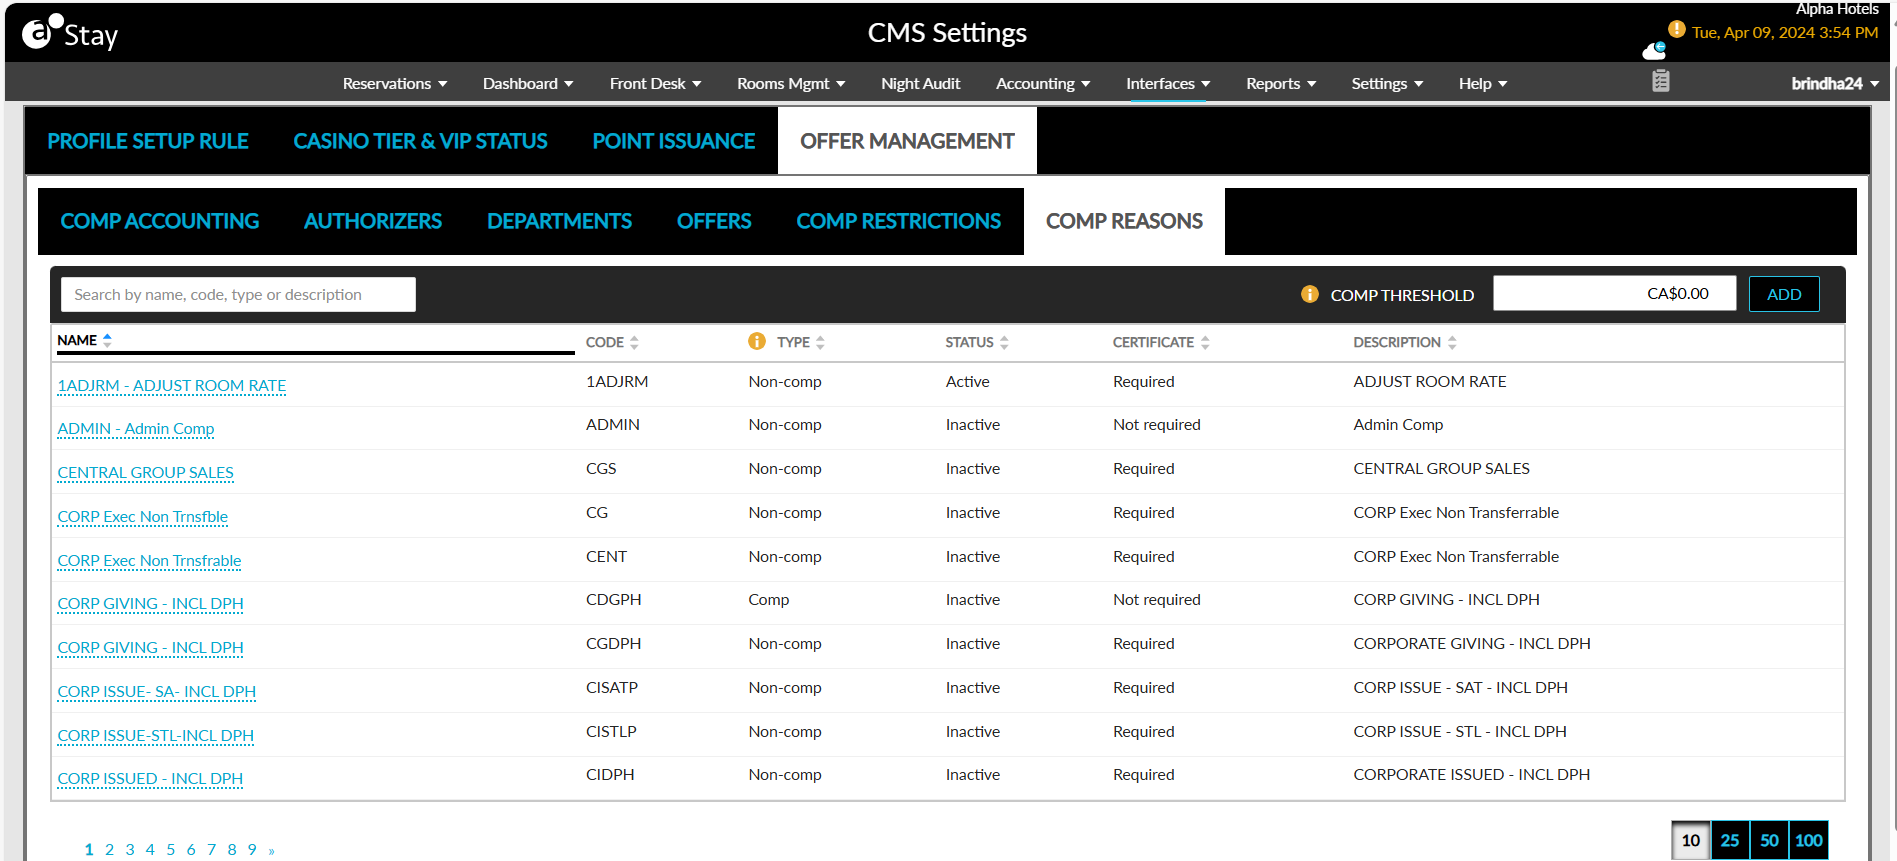
Perform the following steps to create new comp reasons for the property.
Click Add. The Add a Comp Reason pop-up screen appears.
Refer to the following table and fill in the fields.
|
Field |
Description |
|---|---|
|
Active |
Select this checkbox to create active reasons. |
|
Name |
The comp reason. |
|
Code |
The reason code. |
|
Type |
The type of reason. Users can select from the following options:
|
|
Is Certificate Required? |
Enable this flag if a certificate is required for applying the reason. |
|
Description |
The description of the reason. |